Little Faux Peeps Cupcakes
Occasionally I just lose my mind utterly and completely. And a number of factors, from April's First on the First challenge to the coming holiday added up to this little bit of insanity.
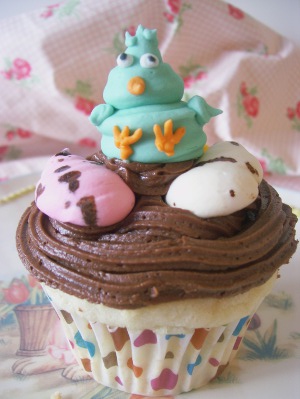
 Say, "Hello!" to the Little Faux Peeps cupcake. And take just a moment to go see the piping of the chicks in my last post. While the chicks aren't marshmallow, the filling is.
 So let's walk through the recipe. The cakes are an adaptation of yet another recipe from Kate Smith chooses her 55 Favorite Ann Pillsbury Cake Recipes.
1/2 c. millet flour
1 c. white rice flour
1/4 + 2 Tbsp sweet rice flour
1/2 c. tapioca starch
2 Tbsp potato starch
1/2 tsp xanthan gum
1 Tbsp baking powder
1/2 tsp salt
1/3 c. shortening
1-1/4 c. sugar
4 egg whites
2/3 c. milk
1 tsp vanilla
1 tsp almond extract
Preheat oven to 350 degrees.
In a bowl, sift together flour, xanthan gum, baking powder, and salt. Set aside.
Cream together shortening and sugar.
 Add egg whites and vanilla, and blend thoroughly. Add flour mixture alternately with milk and then beat on medium-high until smooth.
 Portion into cucpake liners and bake for 20 minutes or until raised and golden.
 Remove from pan and set aside to cool.
1 c. water, divided
2 pkts unflavored gelatin
1-1/2 c. sugar
1 c. corn syrup
1/4 tsp salt
1 tsp vanilla
yellow food color
Place 1/2 c. cold water in the bowl of a stand mixer. Sprinkle gelatin over water and allow to bloom. I really, really don't advise trying this with a handmixer. The sugar syrup is too hot and there are just too many things to handle to do it safely.
 In a saucepan, combine the other 1/2 c. water, sugar, corn syrup, and salt.
 Bring to a boil. And, if you, like me, have chosen a 1 qt. saucepan and find it boiling over - move to a larger saucepan. Then, boil the mixture until it reaches 240 degrees, stirring occasionally to prevent burning. It's really important to hit this target mark, and not go over or under by more than a degree or two. Welcome to the joys of candy-making. The temperature signifies a specific viscosity and behavior of the sugar. I'm a science geek, and I could go into the chemistry but you probably don't really care while you're boiling sugar on the stove. When it's ready, it looks a bit more like this.
 Now, turn the stand mixer on, then slowly pour the sugar syrup down one side of the bowl. You'll find there's a bit of a "sweet spot" where you're not pouring the sugar straight down the side of the bowl (where it will stick and harden) nor into the tines of the whisk attachment (where it will fly around and turn into cotton candy. Kind of). Be very careful with this syrup, as it's basically sugar napalm. If it hits your skin it will stick and burn you much worse than boiling water would. The heat of the syrup will begin to melt the gelatin and the mixture will come together into a smooth liquid.
 Now turn the mixer all the way up and let it beat. Steam will come off. The bowl of your mixer will be very, very hot. See why I don't think you should try this with a hand mixer? Beat on high until the mixture will hold soft peaks and gets light and fluffy. Near the end of the beating, add vanilla and some yellow food color. I recommend Americolor's Egg Yellow. But at least use a gel color. It will take a lot more than you think to get much color at all in the marshmallow. If you try to use liquid color, it will probably take you the whole bottle and you run the risk of watering down the marshmallow.
 Put the warm marshmallow into a piping bag fitted with a large star tip. Use this to fill the cupcakes.

3/4 c. cocoa powder
1 Tbsp vanilla
1-1/2 lbs powdered sugar
1/4 c. + 2 Tbsp milk
Cream butter until fluffy. Add cocoa powder and mix until thoroughly blended. Start the mixing on the very lowest speed or you'll end up with a cloud of cocoa and might die of chocolate lung. Which might not be the worst way to go, but still.


 These are just so stinkin' cute, I'm probably being a little ridiculous.
 Yellow chicks, blue chicks, and eggs of all colors. Plus, yellow marshmallow filling. If you were VERY ambitious, you could certainly tint the marshmallow different colors. Be forewarned, though, that if it cools off much it will set up and you'll never be able to pipe them. Filling the cupcakes with the marshmallow is a sticky, messy business as it is. Add to the chaos at your own risk. It's really tasty, though. I'm still too enamoured of these to let it go yet. Go make your own.
 Tada!! Tell me what you think!

Sno-White Cupcakes
2-1/2 c. Fancy Flour Blend OR1/2 c. millet flour
1 c. white rice flour
1/4 + 2 Tbsp sweet rice flour
1/2 c. tapioca starch
2 Tbsp potato starch
1/2 tsp xanthan gum
1 Tbsp baking powder
1/2 tsp salt
1/3 c. shortening
1-1/4 c. sugar
4 egg whites
2/3 c. milk
1 tsp vanilla
1 tsp almond extract
Preheat oven to 350 degrees.
In a bowl, sift together flour, xanthan gum, baking powder, and salt. Set aside.
Cream together shortening and sugar.


Marshmallow Filling
This makes enough to fill 2 batches of cupcakes, and then some. But there's a downward limit to how small a volume of liquid Geraldine (my KitchenAid Mixer) can handle and effectively whip air into.1 c. water, divided
2 pkts unflavored gelatin
1-1/2 c. sugar
1 c. corn syrup
1/4 tsp salt
1 tsp vanilla
yellow food color
Place 1/2 c. cold water in the bowl of a stand mixer. Sprinkle gelatin over water and allow to bloom. I really, really don't advise trying this with a handmixer. The sugar syrup is too hot and there are just too many things to handle to do it safely.


Chocolate American Buttercream
3/4 c. salted butter3/4 c. cocoa powder
1 Tbsp vanilla
1-1/2 lbs powdered sugar
1/4 c. + 2 Tbsp milk
Cream butter until fluffy. Add cocoa powder and mix until thoroughly blended. Start the mixing on the very lowest speed or you'll end up with a cloud of cocoa and might die of chocolate lung. Which might not be the worst way to go, but still.

Add about a cup of powdered sugar and blend. Then beat in the vanilla. Now, alternate the sugar with the milk until all ingredients are fully incorporated. Stop, lower the bowl, and scrape it down. Then beat the frosting until it's light and fluffy.

You can see the darker chocolate on the center of the beater where a blob of un-whipped frosting remains. In this case, it's OK to leave the frosting a little streaky. Spoon the frosting into a pastry bag fitted with the star tip of your choice. Pipe the frosting in loose, sloppy circles around the edges of each cupcake. Look, nests!

Previously, I had piped two sheet trays of "eggs" and "chicks" in Royal Icing. I removed the chicks to safer quarters, then splashed the "eggs" with a little brown food coloring mixed with rum to speckle them. They've had a day to dry, and now it's time to take three eggs and place them along the inside of the nest. Once the eggs are placed, pipe another blob of buttercream in the center, right over the filling and place a chick on top.
Et voila!


I love what you did with your Royal Icing creations. So cute. I was inspired by you. I had a boat load of stiff icing left over, so I piped it out into "chicks" and "eggs". Super cute!
ReplyDeleteThanks, Donna! Glad you had fun with the idea. Just think how many of those "icing decorations" that are available for sale you can make for yourself, now! ;-)
ReplyDelete